Changelog
- 2023-12-31
- Added GameSir x2 Pro
- Added Hori Split Pad JoyCons
- Added BinBok DOYOKY Classic JoyCons
- Added MayFlash Magic-S Pro 2
- Added JoyCon config
- Added Warframe config
- 2023-03-12
- Controller: Add Scuff Instinct pro
- Controller: Add Kishi v2
- Elite Series 2: Flip primary/shifted right stick main Elite Series 2 control config for smoother default motion with option to ’look fast’ if needed
- No Man’s Sky: Add in-game config
- Destiny 2 config: Re-jigger class and grenades such that there is less shoulder tapping/holds. This requires 4 paddles and is a direct reaction to the Strand Destiny element class
- Destiny 2 general: The 4 paddle requirement for Destiny is optional and the original config has been retained as it does work but is less efficient than the 4 paddle update below
- Destiny 2 in-game config: Update KemoNine configs to reflect changes once Strand launched in Destiny
- General: Cleanup config sections so they now collapse down for easier scanning and reading
What Is Below
I initially intended this post be a guide and review on getting controller gaming to be more accessible. Rather than drone on with too many thousands of words, I felt this post should be condensed into something of a reference and highlights reel and it still ended up being a longer read than I expected.
Below are my general thoughts and opinions on controller gaming. I’ve spent significant time tuning controller configs for Warframe, Destiny 2 and No Man’s Sky. The games I play the most. I’ve also ensured the below setup and approach is easily adapted to pretty much any game. Warframe, Destiny 2 and No Man’s Sky are incredibly complex games when it comes to control schemes and I believe the below is close, if not equal to Keyboard and Mouse input device gaming except for turn speed. Turning speed is a universal ’nerf’ with every game I’ve played to date.
Yes, I just claimed I can match Keyboard and Mouse players with a controller for utility and never moving my thumbs off the move/look sticks. I’ve got over 750 hours in warframe and over 1,8000 hours of play time in Destiny 2. I can play any of the hardest content with the control scheme presented below. If you look close you’ll see just how complex Destiny 2, in particular, is as game and why controller selection is critical. I have included my in-game configurations for Warframe, Destiny 2 and No Man’s Sky below so you can see how the general controller config maps to game actions.
The Only Consideration
Before we get too far into opinion land, I’d like to point out the only considerations I consider important.
They are:
- What works for your hands?
- Is it comfortable?
- Does it cause health issues or pain? (It should not)
- It doesn’t get in the way of you enjoying a game
- Paddles should be a consideration as a requirement. They allow your thumbs to remain on look/move and still retain the ability to jump/reload/etc while also moving and looking around
- Ensure there are at least two buttons/paddles on the controller grips OR it has 3 total buttons per ‘shoulder’: standard shoulder button, trigger, additional button that can be bound to any other button
If the above considerations are met, I think it’s a perfectly valid and acceptable controller for use.
This post is about how I got controllers to “get out of my way” and be comfortable for regular use. Nothing more.
Organization
This rest of this post is organized as sections with the following order.
- A note on controller clips
- A note on USB adapters for Playstation and JoyCon controllers to make them more usable on non-native platforms
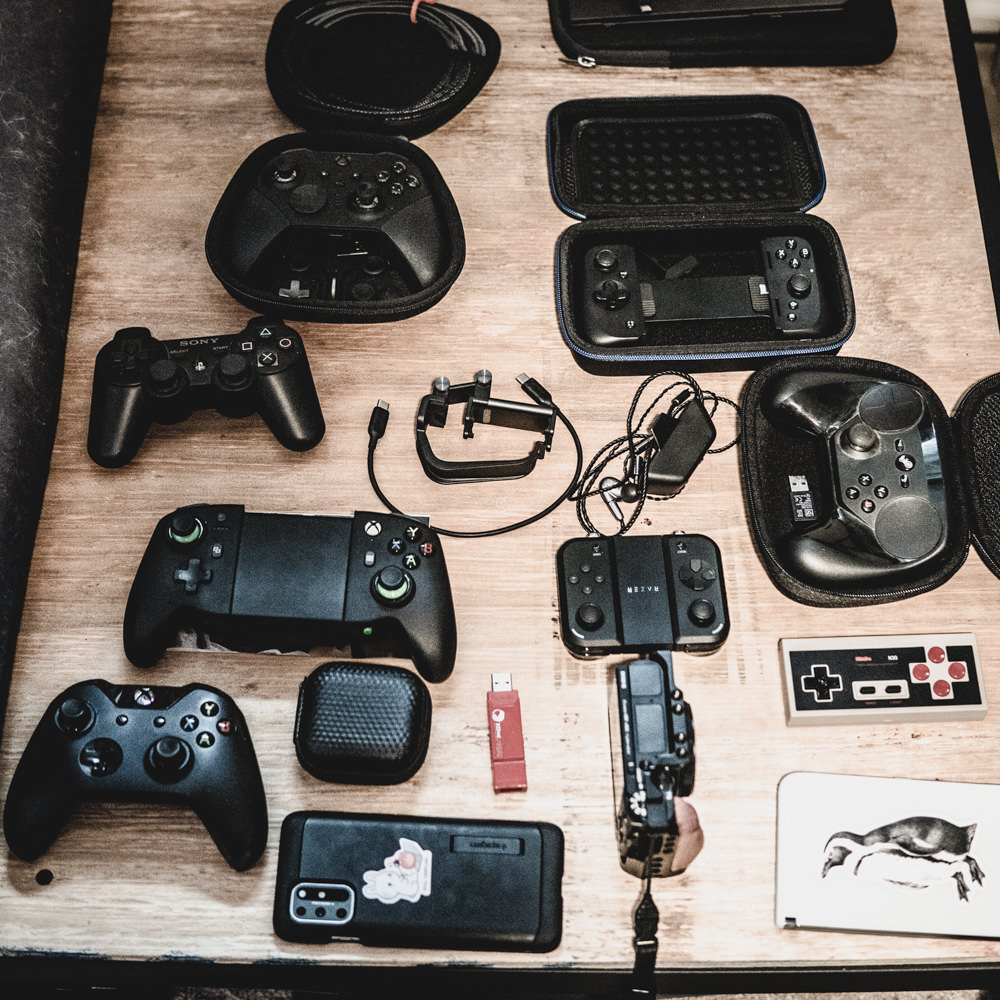
- Controllers I’d recommend and any notes I have after regular use
- Links to sites selling controllers and accessories I’d consider purchasing
- My primary controller configurations
- My in-game controller configurations
Controller Clips
Xbox Controller Clips
While reviewing the controllers below, I’d like to call attention to the 8bitdo controller clip and the fact that it works very well with a number of Xbox styled controllers. It works so well, I use it with my Microsoft Elite Series 2 as well as my Scuff Instinct Pro. I also have a short usb-c cable I use to connect the controller to the phone.
It can be a really good option for phones that won’t work with some of the nicer, more phone focused controllers.
Some Considerations
- Very good options available
- Lets you use a lot of ‘good’ controllers freely
- Weight/portability can be an issue
- Center of gravity can be a problem depending on the controller
JoyCon Clips
If you are considering JoyCons for non-switch gaming (imo: you should), I’d like to call attention to the Joyclamp on Tindie from an open hardware person. The clamp setup will allow you to attach JoyCons to phones and tablets to facilitate more generic controller support on mobile.
I’ve included a link in the Links section to the product page.
Some Considerations
- Very helpful for oddly sized devices
- Vertical orientation support can sometimes be problematic (See the
Adapters & Compatibilitysection for additional detail) - Rumble can get ‘stuck’ until you perform another action that triggers rumble allowing the state to re-set
- Connecting JoyCons via bluetooth can be fiddly and take multiple attempts to get them into ‘vertical mode’ when used on non-switch platforms
Adapters & Compatibility
Before getting to the actual controllers, I’d like to point out some compatibility problems I’ve seen over time.
- JoyCons default to horizontal orientation when used over bluetooth and it can require a USB adapter to force them into vertical orientation
- JoyCons can be fiddly upon initial connection but once they are in the right ‘mode’, without lag, they work very well. This is a well known quirk and pain point with JoyCons
- Playstation controllers I’ve always struggled to get working without an adapter, please consider using an adapter with Playstation controllers
To work around the JoyCon compatibility issues above, I bought a MayFlash Magic-S Pro 2 adapter that works with USB type-a as well as usb-c adapters and OTG adapters. This is particularly useful with JoyCons and tablets or folding phones. The MayFlash makes bluetooth JoyCons work in vertical orientation more reliably and I’ve found them to save a lot of hassles related to JoyCons on non-switch platforms.
I’ve included a link to the MayFlash website in the Links section.
Some additional notes on the MayFlash when used with JoyCons:
- If there is lag to the controls: re-connect the JoyCons
- If a JoyCon gets ‘stuck’ in horizontal mode: re-connect the JoyCons
- Connecting the right then left JoyCon tends to be more reliable for connections
- The
XInputmode of the MayFlash works reliably on Android and shows the adapter as a generic Xbox 360 controller
Controllers
Microsoft Elite Series 2
- Hard to beat for comfort
- I especially like the paddle layout and where the rear paddles are placed
- The paddles do not work over Bluetooth
- I do not recommend this controller if you need Bluetooth connection support
- The tuning app is second to none, it’s worth the extra cost to me
Scuff Instinct
- Next best controller to the Microsoft Elite Series 2
- The paddles are more horizontally laid out and its difficult to push both paddles on the same side concurrently
- The ‘rear’ paddle is a ‘push’ motion which confuses my mind slightly
- It works with paddles over Bluetooth
- The profiles for button mappings to the paddles works
- The tuning is far less than the Microsoft Elite Series 2 but more than enough for general gaming
Razor Kishi v1 and v2
- v1 not worth it due to lack of paddles/grip buttons and it’s End Of Life, avoid this version
- v2 is very nice if your phone can be used with it
- The app is required for extra button mapping the two extra shoulder buttons
- Light and portable
- No first party case but third party cases work well
Gamsir X2 Pro
- Next best mobile controller to the Kishi v2
- Has 2 paddles
- Will fit more usb-c phones than the Kishi
- Slightly odd paddle placement
- The app is required for paddle mapping
- Came with a case that can also hold a phone without modifications
BinBok DOYOKY Classic JoyCons
- Best overall JoyCons
- Need adapter or OS support for vertical mode (known issue with all JoyCons)
- Works with Bluetooth quite well on non-switch platforms
- Has rumble support
Hori Split Pad (Compact & Pro)
- Best wired JoyCons
- The
Attachmentversions come with the JoyCons and USB adapter - Lack bluetooth, only USB and native switch support
- Lack rumble support
8bitdo NES Controller
- Works great with bluetooth
- If you need an original style NES controller, this is the one to buy in my opinion
PowerA MOGA XP-7
- Has 2 paddles, one on each grip
- Worth considering for mobile and or bluetooth needs if the Kishi v2 isn’t an option in my opinion
- Can hold most phones in cases in my light testing
- Big and semi-heavy, worthy of xbox controller licensing
- It works with paddles over bluetooth
- Way to large and unwieldy with my phone in my hands
- The charging is via Qi (wireless) only
Links
The following links are in no particular order and my recommended starting points for finding controllers.
- https://www.powera.com/
- https://www.gamesir.hk/collections/types?q=Gamepads
- https://www.8bitdo.com/
- https://www.nacongaming.com/en-US/peripherals/controllers
- https://scufgaming.com/
- https://www.razer.com/mobile/controllers
- https://playbackbone.com/
- https://stores.horiusa.com/
- https://binbok.com/
- https://mayflash.com
- https://www.tindie.com/products/biodiance/joyclamp/
General Controller Configurations
General Notes (click to expand)
- If you need a controller layout that doesn’t rely on the
Shiftfunction, please see the4 Paddle Generic Configconfiguration below - If you need a controller layout for just 2 paddles, please see the
2 Paddle Generic Configconfiguration below - These are my starting point for games at the controller level. I do tune for individual games, these controller configs are mainly to keep base controller config consistent across controllers
- I try very hard to keep functions to specific buttons and paddles in my gaming so this is just a general starting point. I do a lot of in-game configuration too. The below in-game configurations show how I leverage these base controller configurations
KemoNine's 4 Paddle Generic Config (click to expand)
Tuned for the Scuf Instinct Pro and other 4 paddle controllers without ‘shift’ support
- Left Rear Paddle
- Default: X
- Destiny 2: D-pad Up
- Left Front Paddle
- B
- Right Rear Paddle
- Y
- Right Front Paddle
- A
KemoNine's 2 Paddle Generic Config (click to expand)
Tuned for Kishi, GameSir and JoyCon controllers
- Left
- Default: B
- Joyon: D-pad Left
- Right
- A
KemoNine's JoyCon Config (Vertical Orientation)
Tuned for 2 paddle JoyCons
- Plus (at top of right JoyCon)
- Menu icon (the one to the right of the Xbox button)
- Dash/Minus (at top of left JoyCon)
- Window icon (the one to the left of the Xbox button)
- Home (at bottom of right JoyCon)
- Xbox Button / Guide Button
- Screenshot (at bottom of left JoyCon)
- Unmapped. This button can not be mapped per my testing
- Right Paddle
- A
- Left Paddle
- D-pad Left
KemoNine's Microsoft Elite Series 2 Config (click to expand)
Tuned for Destiny 2 and similarly complex control schemes
Only the paddles need button mappings, assign everything else to match the physical controller
- Left Rear Paddle
- Primary: D-Pad Up
- Shift: X
- Left Front Paddle
- Check
Use as Shift button - Right Rear Paddle
- Primary: Y
- Shift: D-Pad Right
- Right Front Paddle
- Primary: A
- Shift: B
- Left Stick
- Primary: - Sensitivity Curve: Aggressive
- Curve adjustment: Fourth notch from left
- Shift: - Sensitivity Curve: Aggressive
- Curve adjustment: Fourth notch from the left
- Primary: - Sensitivity Curve: Aggressive
- Right Stick
- Primary: - Sensitivity Curve: Smooth
- Curve adjustment: None
- Shift: - Sensitivity curve: Smooth
- Curve adjustment: Fourth notch from the left
- Primary: - Sensitivity Curve: Smooth
- Triggers
- Left: 0 - 100
- Right: 50 - 100
- Vibration
- Set all sliders to the seventh notch from the left
- Color
- Brightness: 50% (ish)
- Color: White
In-Game Configurations
KemoNine's Warframe In-Game Config (Steam / click to expand)
- Community link: steam://controllerconfig/230410/3116367757
- Works with 2 or 4 paddle generic configs
- Tested with Scuf Instinct Pro
- Tested with 2 paddle JoyCons
KemoNine's Destiny 2 In-Game Config (click to expand)
- General
- Look sensitivity: 8 (direct hid)
- Look sensitivity: 12 (steam link / elite)
- Look sensitivity: 10 (steam link / powera moba xp7x plus)
- Ads sensitivity modifier: 0.5
- Sprint-turn scale: 0.8
- Vertical inversion: inverted (I’m a monster, deal with it)
- Buttons: (Be sure to start with the defaults before applying the below.)
- Fire: right triger (single press)
- Hold zoom: left trigger (single press)
- Reload: left stick (double press)
- Alternate weapon action: dpad right (single press)
- Auto melee: right shoulder (single press)
- Grenade: (Tune based on number of paddles)
- 2 paddles or less: left shoulder (double press)
- 4 paddles or more: left shoulder (single press)
- 2 paddles or less: left shoulder (double press)
- Super: left + right shoulder (single press concurrently – combo/chord)
- Jump: a (single press)
- Finisher: right stick (single press)
- Highlight player: right stick (long press)
- Sprint: left stick (single press)
- Toggle crouch: right stick (double press)
- Light attack: right shoulder (single press)
- Heavy attack: right trigger (single press)
- Block: left trigger (long press / hold)
- Stasis breakout: b (double press)
- Class ability (all): (tune based on number of paddles)
- 2 paddles or less: left shoulder (long press)
- 4 paddles or more: b (single press)
- Air dive ability: (tune based on number of paddles)
- 2 paddles or less: left shoulder (long press)
- 4 paddles or more: b (single press)
- Swap to kinetic or energy weapon: y (single press)
- Swap to power weapon: y (long press)
- Interact: dpad up (single press)
- Emoji 1: dpad left (double press) / thanks
- Emoji 2: dpad left (long press) / face palm
- Emoji 3: dpad down (double press) / cowbell
- Emoji 4: dpad down (long press) / salute or sit
- Tuneables
- If you find yourself needing stasis breakout in a better spot than b, dpad may be a good spot if you can spare an emoji
- Long press events trigger single press events ; you should NOT overlap long and single press on a single button
- Important Notes
- ALL config has been play tested heavily
- This setup alternates hands for complimentary actions and balancing forces applied to buttons/triggers/sticks as you play
- This lets you move around while holding sticks for things like ‘interact holds’ or ’toggle crouch’ – if you have crouch on movement stick itll auto-drop you out of crouch because youve tripped the movement stick – moving it to look stick fixed the problem – the game engine input processing limits stick config options that work with the flow of movement in-game
- You can safely shuffle some things around based on usage patterns ; just dont change single/double/hold for how things activate ; a lot of this layout avoids issues with the input engine (see below)
- Long press events trigger single press events ; you should NOT overlap long and single press on a single button – this appears to be a BUG in the input engine code
- With Strand using so many grenade, class ability and melee actions, the 4 paddle version was updated to make it easier to manage ability spam. The 2 paddle form does work but is harder to use tactically in my opinion and prompted the updates above
KemoNine's No Man's Sky In-Game Config (click to expand)
- Important Notes
- This setup was reconciled against Destiny 2. In particular the
Discoveries / OptionsandInventoriesfunctions are in opposite locations compared to Destiny 2 by default and I have flipped them universally to help with muscle memory when swapping between the two games.
- This setup was reconciled against Destiny 2. In particular the
- Menus
- View Button: Skip, Discoveries / Options
- Menu Button: Options / Quit
- Left Stick Click: Retry Network Connection
- Right Stick Click: Discard Item, Delete, Pin Formula
- Y: Quick Transfer, Retry Network Connection, Toggle Wiring Mode
- X: Initiate Process, Toggle Trade Inventory, Toggle Edit / Build
- B: Mode Select: Cancel, Back, Exit Menu
- A: Confirm (Menus)
- On Foot
- View Button: Discoveries / Options, Skip
- Menu Button: Inventories
- Left Stick Click: Zoom, Pick Up Technology, Run
- Right Stick Click: Scan
- Y: Change Weapon Mode
- X: Interact, Place Marker, Tag Marker, Reload Weapon
- B: Switch Alt Weapon, Back
- A: Jump, Secondary Interaction
- Quick Menu (On Foot)
- View Button: Discoveries / Options
- Menu Button: Inventories
- Left Stick Click: Run
- Right Stick Click: N/A
- Y: Change Weapon Mode
- X: Change Terrain Shape, Interact
- B: Switch Alt Weapon, Back, Toggle Terrain Mine / Create
- A: Jump, Confirm (Quick Menu)
- Flight Controls
- View Button: Discoveries / Options, Skip
- Menu Button: Inventories
- Left Stick Click: Zoom In
- Right Stick Click: Scan
- Y: Change Weapon Mode
- X: Land Ship, Exit Ship, Tag Marker, Combat Autopilot (Toggle)
- B: Boost, Back
- A: Thrust
- Quick Menu (Ship)
- View Button: Discoveries / Options
- Menu Button: Inventories
- Left Stick Click: N/A
- Right Stick Click: N/A
- Y: N/A
- X: Land Ship
- B: Back
- A: Confirm (Quick Menu)
- Exocraft
- View Button: Discoveries / Options, Skip
- Menu Button: Inventories
- Left Stick Click: Horn
- Right Stick Click: Perform Scan
- Y: Switch Weapon Mode
- X: Exit Exocraft, Tag Marker
- B: Delete Checkpoint, Back
- A: Vertical Thrust
- Galactic Map
- View Button: N/A
- Menu Button: Exit Map
- Left Stick Click: View Current Location
- Right Stick Click: Scan
- Y: Expand System Info
- X: Add Waypoint
- B: Back
- A: Confirm (Menus)
- Photo Mode
- View Button: Discoveries / Options
- Menu Button: Inventories
- Photo Mode (Menu)
- View Button: Discoveries / Options
- Menu Button: Inventories
- Base Part Editing
- View Button: Discoveries / Options
- Menu Button: Recolour Building Part
- Left Stick Click: Run
- Right Stick Click: Toggle Build Camera
- Y: Toggle Wiring Mode
- X: Toggle Edit / Build
- B: Back
- A: Jump
- Base Part Placing
- View Button: Discoveries / Options
- Menu Button: Recolour Building Part
- Left Stick Click: Run
- Right Stick Click: Toggle Build Camera
- Y: Toggle Wiring Mode
- X: Toggle Edit / Build
- B: Back
- A: Jump